Welcome to my food blog! I am your average home cook and I want to share my love of food with the world. I'll divulge my recipes as often as possible. Feel free to comment or to email me at nodessertpodcast@gmail.com! Don' forget to come by often for new posts... I love having you visit me!


Showing posts with label side dish. Show all posts

January 2, 2020

Cornbread Casserole - Instant Pot Inspirations #2

It's a new year! Welcome 2020. One of my cooking goals in 2020 is to use my instant pot more. I was so thrilled to get it and then so scared to use it. Now I am completely in love. For New Year's day dinner I made one of my side dishes in it and I want to share the recipe with you to start the new year right! It came out so much moister and more tender than the oven version and I think you will enjoy it as much as I did. I found the original recipe HERE and then modified it slightly. You will need an electric pressure cooker for this recipe as well as a mini bundt pan (preferably nonstick). I found the bundt pan super cheap at my local Aldi a few months ago, but I know you can also find them at Amazon, and I believe possibly Walmart or Target.

Instant Pot Corn Casserole

Ingredients:

  • 2 eggs
  • 1 box Jiffy cornbread mix
  • 1 cup shredded cheddar
  • 1 can creamed corn
  • 4 tbs melted butter
  • 1/2 cup sour cream (I only use Breakstone's)
  • salt & pepper


Directions:
Mix all ingredients together. Grease mini bundt pan. Pour batter into pan and then cover tightly with foil. Put two cups of water in the inner pot. Place your trivet inside (mine is the metal one that comes with your pot, I also believe they sell silicone versions and you could also use that with no problem), and then place the bundt pan on your trivet. Secure your lid and make sure your valve is set to sealing. Hit the pressure cook button and set your time to 45 minutes. When the cooking is complete, do a quick release. Once your pin drops, carefully remove the bundt pan and let cool for at least 5 minutes. Then carefully remove the casserole from the bundt pan onto a plate. Enjoy!

September 18, 2019

Simply Sides 27 - Better Than a Restaurant Mexican Rice

As promised in my last post for the queso chicken, today's recipe is an easy way to make a delicious rice side dish. In my opinion, this recipe is even better than a lot of the rice I have at Mexican restaurants. Plus you can control the amount of spices you put it in so you can make it as flavorful as you like!

Better Than a Restaurant Mexican Rice

Ingredients:

  • 2 cups long grain white rice
  • 1 8oz can tomato sauce
  • 3 cups chicken broth
  • 1/2 a small onion, diced
  • 1 tsp cumin
  • salt & pepper
  • 1 tbs olive oil

***optional: 1 clove garlic minced

Directions:
Saute the onion in olive oil for 5 minutes. Season with salt, pepper, and cumin. If you are adding garlic, saute now for 1 minute. Stir in the rice.  Saute for 2 minutes until rice is coated with oil and seasonings and begins to toast. Add in 1/2 the can of tomato sauce; stir well. Pour in chicken broth and bring to a boil.  Reduce to a very low simmer and place a lid on. Steam rice for 25-30 minutes.  When the rice is cooked through, add the remaining tomato sauce if desired, and fluff with a fork. Serve with your favorite Mexican or Southwestern meal. Enjoy!


April 2, 2019

Simply Sides 26 - Funeral Potatoes

I can't believe it has already been 2 months since I have given you a new recipe but a lot has been going on around here. In January hubs brought me home a new kitty fur baby he adopted from our local shelter and in February we adopted a doggy fur baby from an event that our local shelter was having at a PetSmart location. I have attached their pics at the bottom of this post so you can see my new kids! And now on to our new recipe...
Do NOT be discouraged by the name of this dish! It is nothing morbid, in fact it is a flavorful & cheesy potato side dish that you will want to eat often. Funeral potatoes are also called hashbrown casserole, cheesy hashbrown casserole, and party potatoes so if you feel weird calling them funeral potatoes, use one of the monikers. The best part of this dish is that it hits so many cravings people have. Cheesy, salty, crunchy, creamy... And very comforting! This is also an extremely easy dish to make, so try it soon!

Funeral Potatoes

Ingredients:

  • 1 bag of fresh shredded potatoes (I use Simply Potatoes, plain hashbrowns - find them in the refrigerated section of the grocery store, by the eggs etc). **You can also use frozen, you may need to bake the casserole for longer.
  • 2 cups sour cream (1 16oz container should be fine, I use Breakstone's)
  • 1 can cream of chicken soup (I use Campbell's)
  • 1 onion, diced
  • 1 package shredded cheddar (or grate a block and use 2 cups)
  • salt & pepper to taste
  • 2 cups potato chips, crushed
  • 2 tbs butter, melted


Directions:
Preheat oven to 350. Grease a 9x13 baking dish. In a bowl, mix together sour cream, cream of chicken soup, onion, salt & pepper, and shredded cheese. Fold in potatoes. Combine butter and crushed chips in a separate bowl. Pour sour cream/potato mixture into 9x13 pan. Top with chip mixture. Bake for 30-45 minutes (closer to an hour if using frozen hashbrowns). Enjoy!


October 15, 2018

Simply Sides 25 - Parmesan Green Beans

This is a simple side dish that has a lot of flavor. The prep is easy and the green beans cook quickly. It does require the green beans to be fresh, so make sure they are in season when making this.  Besides the green beans, all of the other items are pantry staples for me that I always have on hand. I also think this recipe would be good with broccoli or cauliflower, but you may have to roast them a little longer than you would the green beans.

Parmesan Green Beans

Ingredients:

  • 12-16 oz package of fresh green beans, trimmed
  • 1 egg, beaten
  • 2 tbs olive oil
  • 1/2 cup grated Parmesan
  • 2 cloves garlic, minced
  • 1 tbs garlic salt (I use Lawry's)


Directions:
Preheat oven to 425. Mix together egg, olive oil, parmesan, and garlic salt. Add green beans and toss well. Spread into a single layer on a foil lined baking sheet (tip: lining your baking sheet with foil is great for tons of recipes and saves you clean up time). Bake for 15 minutes. Enjoy!


October 9, 2018

Pizza Zucchini Casserole - Home Cooked Recipe #82

Do you love pizza? I love pizza! Most people I know are a fan of pizza. Also, most people I know have gone low carb or keto lately. This is a perfect recipe for those kind of diets! And it's pizza flavored! This recipe is also versatile, because you could really dress it up with your favorite pizza toppings. You could make it a meat lovers by adding sausage, bacon, ham, ground beef, etc. You could make it a supreme by adding bell peppers, onions, mushrooms, etc. If you don't like tomato sauce, use alfredo sauce. Use the recipe as a base and use your imagination to top it the way you would your favorite pizza!

Pizza Zucchini Casserole

Ingredients:

  • 2 medium zucchini, shredded
  • 2 eggs, beaten
  • 1/2 cup pizza or marinara sauce (make your own or use store bought)
  • 1 cup parmesan
  • 2 cups mozzarella
  • 1/2 package pepperoni (I use Armour, it has a nice, spicy kick)
  • salt & pepper


Directions:
Preheat oven to 400. *Tip make sure you squeeze out excess moisture in the zucchini first. I like to lay mine on some paper towels and leave it for an hour or so. Super easy* Mix together in a large bowl the zucchini, eggs, parmesan, salt, pepper, & 1/2 the mozzarella (1 cup). Press mixture into a 9x13 pan and bake for 20 minutes. Take out of the oven and top with pizza sauce, cheese, and then pepperoni. Place back into the oven and continue baking for another 20-30 minutes.  Enjoy!


May 22, 2018

Copycat Southwest Egg Rolls - Pinterest Pick #20

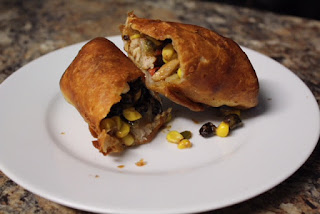
My friend Tanya is a HUGE fan of Chili's and their Southwest Egg Rolls. I enjoy them myself, and thought I would try to make a copycat recipe I found on Pinterest. I changed a couple of things. I left out the spinach (yuck, I am not a fan lol) & I just made regular ranch dressing as opposed to the Avocado Ranch to go with them. You could easily mash half an avocado and add it to some ranch dressing and you would have your Avocado Ranch. Also, I saute'd my chicken breast instead of grilling it as I already had a saute pan going and there's no point in heating up a grill for 1 chicken breast. I added onion powder and garlic powder to the spice mix because HELLO, flavor! I do prefer my ranch homemade and not out of a bottle, so I made it with a packet. These were delicious, and I cannot wait to try out more egg roll recipes as they are one of my favorite food items! You can find the original Pin HERE and the original recipe HERE.

Copycat Southwest Egg Rolls

Ingredients:

  • 5 flour tortillas (I used the Mission Super Soft, Soft Taco size)
  • 1 chicken breast, diced into small pieces
  • 1 cup corn
  • 2 tbs of red pepper, diced
  • 1/2 cup black beans, rinsed
  • 2 green onions, thinly sliced
  • 2 tbs jarred jalapenos, diced
  • 1/2 tsp cumin
  • 1/2 tsp chili powder
  • 1 tsp onion powder
  • 1 tsp garlic powder
  • dash of cayenne
  • salt & pepper to taste
  • 3/4 cup shredded Monterrey Jack
  • oil for frying, butter for sauteing chicken


Directions:
Saute chicken breast pieces in a tablespoon of butter over medium heat (or you can grill your chicken breast if your prefer). Once it is cooked through (about 5 minutes), add in corn, red pepper, black beans, green onions, and jalapenos. Saute another 5 minutes. Add in spices, mix very well, and cook an additional 2 minutes. Remove from heat and let filling cool completely. Stir in cheese. Fill tortillas with filling and wrap tightly into an egg roll shape (secure with tooth picks). The original recipe I used said to let them sit 4 hours to over night, and I chose to let them sit in the fridge over night. I deep fried mine at 375 for 12 minutes. Serve with ranch or Avocado Ranch.
Enjoy!


May 14, 2018

Simply Sides 24 - German Potato Salad

I am always looking for ways to make our weeknight meals more exciting with new side dishes. I was a little nervous that hubs would not like this tangy potato dish, but it turns out that he really enjoyed it. Now we have new side dish to add to our lineup! I looked at a few different recipes and came up with my own spin that turned out pretty delish. And even though this is called potato salad, it really is more like a warm potato side as opposed to what I think of as salad.

German Potato Salad

Ingredients:

  • 6 red potatoes, sliced thin
  • 1 onion, diced
  • 2 cloves garlic, minced
  • 4 strips of bacon, diced
  • 3 tbs white wine vinegar
  • 2 tbs water
  • 1 tbs brown mustard
  • 1 tsp sugar
  • 1 tbs dried dill
  • salt & pepper


Directions:
Bring potato slices to a boil & cook for 8 minutes. Drain. While potatoes are cooking, cook bacon in a skillet over medium until pieces are brown and crispy. Drain on paper towels. In bacon drippings, saute onions for 5 minutes. Add in garlic and saute another 2 minutes. Once onions and garlic are tender and translucent, add in water, sugar, mustard, and 2 tbs of the vinegar & stir well. Add in potatoes and sprinkle the last tbs of vinegar on. Sprinkle with dill, salt, & pepper. Toss well to coat potatoes. Sprinkle in drained bacon pieces and stir again.  Serve warm.
Enjoy!


July 18, 2017

Simply Sides 22 - Potato Gratin

Creamy, cheesy potatoes? Yes please.  Potatoes with cheese is one of the great comfort combinations of our time.  And this simple side dish will satisfy that comfort food craving.  Serve with any protein and veggie.  It'll be the highlight of your meal!

Potato Gratin

Ingredients:

  • 4 large potatoes, thinly sliced (I used a mandolin)
  • 1 onion, thinly sliced
  • 1 stick butter, sliced
  • 1/2 cup heavy cream
  • 4 oz grated sharp cheddar
  • 4 oz grated gruyer
  • salt & pepper


Directions:
Preheat oven to 350.
Grease an 8x8 baking dish with butter or cooking spray.  Place a thin layer of potatoes on the bottom.  Add a few onion slices.  Sprinkle with salt and pepper.  Dot a few butter slices on top.  Sprinkle a bit of cheddar and gruyer.  Repeat two to three more times. Drizzle heavy cream over top of dish.  Bake for 1 hour.
Enjoy!


June 28, 2017

Simply Sides 23 - Cheesy Roasted Tomatoes

I have noticed a trend that side dishes with cheese attract me the most...  This recipe will be no different!  I was scrolling through Pinterest and I saw a recipe for roasted Parmesan tomatoes.  I though to myself, I don't have fresh parm, but what if I use my shredded provolone and mozarella blend?  And instead of fresh herbs, which I also didn't have, use garlic salt and fresh cracked pepper to season them?  Do you know what the result was??? DELICIOUS!  They tasted just like crustless pizza.  Seriously, I would not lie to you.  This is a great recipe if you are eating low carb.  It's a great recipe for a fairly healthy snack or side dish.  It's a great recipe if you are looking for something super simple to make.  Frankly, it's just a great recipe in general!  It really satisfied a pizza craving I was having, without all the extra crust calories. Make this, you won't be disappointed!

Cheesy Roasted Tomatoes

Ingredients:

  • 3 tomatoes on the vine, slice into 4 slices each (total of 12)
  • 4 oz shredded cheese (I used a mozzarella/provolone blend - highly recommend)
  • olive oil (about 1 tbs)
  • garlic salt (I use Lawry's)
  • fresh cracked black pepper


Directions:
Preheat oven to 400.
Place tomato slices on foil lined baking sheet.  Sprinkle lightly with garlic salt and pepper.  Bake for 10 minutes. Then, drizzle lightly with olive oil. Top with cheese. Bake another 10 minutes til cheese is browned and bubbly. 
Enjoy!


December 28, 2015

Simply Sides 21 - Brussel Sprouts Gratin

I have been very adventurous with food in my 30's so far.  We never had brussel sprouts growing up in my parent's house.  So I was 34 before I even tried them!  I like them a lot, and am not sure what all the fuss is about.  They're just mini cabbages.  And I like cabbage!  Gruyere cheese was on sale this week at my local Aldi, as were brussel sprouts.  So I picked up both and got to work making this AMAZING side dish.  Crunchy, creamy, and just plain delish!  You must try this! Find the original recipe HERE.


Brussel Sprout Gratin

Ingredients:

  • 16 oz brussel sprouts, trimmed
  • salt and pepper
  • olive oil
  • 1 tbs butter
  • 1 tbs flour
  • 3/4 cup milk (I used 2%)
  • 2 oz grated Gruyere (use white cheddar if Gruyere is not available or too pricey)
  • a couple sprinkles of grated parmesan


Directions:
Preheat oven to 400.
Toss brussel sprouts with a drizzle of olive oil and season with salt and pepper.  Roast for 20 minutes.  Stir and then cook another 10 minutes.
Meanwhile, melt butter in pan.  Stir in flour and cook for 3-4 minutes until flour taste is cooked out.  Stir in milk, and a bit more salt and pepper.  Let thicken for a minute.  Stir in half the Gruyere and a sprinkle of parmesan.  Pour over top of brussel spouts.  Sprinkle remaining Gruyere and parmesan over top. Bake another ten minutes until brown and bubbly.  Enjoy!

December 14, 2015

Corn Dog Mini-Muffins - Pinterest Pick #10

I have seen this recipe on Pinterest several times and a couple weeks ago I thought that it was time to make it!  You can find my pin for it HERE and the original recipe HERE. To make it better, next time, I need to bake it about 2-3 minutes less.  Also, I might add some shredded cheese right before I push the hot dogs in.  The only thing I changed in this recipe so far was to pre-bake my hot dogs before putting them in the muffin tin, because I like my hot dogs really well done.  You do it the way you like!

Mini Corn Dog Muffins

Ingredients:
  • 1 box Jiffy corn muffin mix
  • 1 egg
  • 1/3 cup milk
  • 3 hot dogs, cut into 8 pieces each

Directions:
Preheat oven to 400.  If you are pre-baking your hot dog pieces, now is the time to stick them in the oven!
Prepare batter by stirring together Jiffy mix, eggs, and milk.  Let rest 5 minutes. Spoon a tablespoon of batter in each mini muffin cup.  (My pan has 24 slots.)
Place a hot dog bite in the middle of each batter cup.  Bake for 10 minutes (Next time I will only bake for 8, so you could start with 8 minutes and check on them from there).  I served mine with homemade honey mustard.
Enjoy!


October 19, 2015

Simply Sides 20 - Hot Spinach Artichoke Dip

I was craving spinach and artichoke dip a few weeks ago.  I've never made it, only ordered it out or had it at parties.  I ran across a recipe on Hellmann's mayo website, and tried it out.  It was pretty good, but I have some ideas of how to change it up and make it my own, and I will next time! You can find the original recipe HERE.

Hot Spinach and Artichoke Dip

Ingredients:
  • 10oz box frozen chopped spinach, thawed
  • 8oz cream cheese (let sit at room temp at least 4 hours or microwave, stirring every 10 seconds)
  • 3/4 cup mayo (I only use Hellmann's, use what you like)
  • 1 and 1/2 cups shredded cheese
  • 1 package Knorr veg mix
  • 1 can artichokes, drained and chopped (I got mine from Trader Joe's)
  • 2 cloves garlic, minced


Directions:
Preheat oven to 350
Combine all ingredients except 1/2 cup of cheese.  Mix well then put in baking dish.  Top with remaining cheese. Bake 35 minutes.  Serve with bread cubes or tortilla chips.

Enjoy!


June 16, 2015

Bacon and Cheddar Quiche - Pinterest Pick #8

This week's recipe is a Pinterest pick!  It's easy, tasty, and can be used as a main dish, a side dish - or breakfast, lunch or dinner! The cheese and bacon make it delicious.  And it's fairly affordable.  Check out my pin HERE and get the original recipe HERE.

Bacon and Cheddar Quiche

Ingredients:
  • 3 eggs
  • 1/2 cup heavy cream
  • 1 cup 2% milk
  • 8 oz shredded cheddar (I used Sharp White Cheddar)
  • 1/2 lb bacon, cooked and crumbled
  • 1 refrigerated pie crust
  • salt and pepper
  • cayenne
  • smoked paprika


Directions:
Preheat oven to 375
Roll out pie dough and press into pie dish.  Top dough with 2/3 the bacon, and 2/3 the cheese.  Beat together the eggs, cream, milk, and spices.  Pour custard mixture into pie.  Sprinkle top of pie with remaining cheese and bacon.  Bake for 45 minutes to 1 hour.
Enjoy!
***Note, I served mine with a caesar salad and it made a delicious dinner!


June 12, 2015

Simply Sides 19 - Classic Pasta Salad

Pasta salad runs rampant in the summertime!  I like all sorts of salads that involve pasta, but this one is a classic.  A light, mayo-less dressing with a few hearty ingredients and a few fresh ingredients.  It should be a go to for any BBQ!

Classic Pasta Salad

Ingredients:

  • 1 12-16oz box rotini
  • 1 packet of italian dressing seasoning
  • 3 tbs water
  • 2 tbs oil
  • 1/2 cup bottled italian dressing
  • 1 roasted red pepper, diced
  • 1 small can sliced black olives
  • 1 handful shredded mozzarella
  • 1 diced fresh tomato
  • 1/2 lb salami, diced

***optional: sliced or diced red onion, diced cucumber, swap mozzarella for provolone, grated parmesan

Directions:
Boil pasta as package directs.  Drain and let cool.  While pasta is cooling, mix seasoning packet, oil, and water in a bowl.  Toss with pasta until well combined.  Add in all other ingredients and mix well.  Chill for at least 1 hour before serving.
Enjoy!

June 8, 2015

Simply Sides 18 - Pizza Dough Breadsticks

I have been so terribly busy at work!  I didn't disappear but I haven't been posting recipes like I should.  But that's because I haven't really had time to cook too many new things either!  Last week however I did make a couple of side dishes, so I will post both those recipes this week.  And hopefully come up with a new main dish this week that I can post next week.
Today's post is about bread sticks.  They're really easy because you start with store bought pizza dough.  But they're better than pre-packaged because you can season them how you like and make them your own!

Pizza Dough Breadsticks

Ingredients:

  • 16 oz fresh (store-bought) pizza dough
  • 1/2 cup olive oil (or a mix of melted butter and olive oil)
  • 1/2 cup grated parmesan
  • 1 tbs granula
  • ted garlic
  • Salt


Directions:
Preheat oven to 425

Roll out dough until you have a rectangular shape.
Spread 1/2 of olive oil over dough in an even layer.  Shake 1/2 of the parmesan over olive oil, evenly.  Sprinkle on salt and garlic. Using a pizza cutter, slice dough into 16 bread sticks.  Twist each bread stick and place on non-stick baking sheet.  Bake for 10-15 minutes until golden brown.  Remove from oven and brush on remaining olive oil and sprinkle with remaining parmesan.
Enjoy!


April 28, 2015

Simply Sides 17 - Cheesy Garlic Grits Casserole

If you have never had grits before, you're missing out.  Now when I say this, I say it with the disclaimer that grits must be prepared properly.  Cooked and seasoned with care and love.  I never ate grits until I was in my 30's.  First, I grew up in NY as a child where grits aren't as common as they are in the South, and second, the idea never appealed to me.  But now that I am older and more open to culinary adventures, I have discovered all sorts of yummy delights.
This casserole is based on a recipe from Paula Deen and it is delicious!  I spice it up with extra black pepper and a dash of cayenne.  I have also toyed with the idea of adding some cripsy bacon bits to it, and next time I make it I think I'll do just that.  This is a great dish as a side, especially with something like shrimp (as in shrimp and grits).  It's also a great main dish for breakfast.  And frankly, I just like to snack on it too.

Cheesy Garlic Grits Casserole

Ingredients:

  • 2 cups regular grits (do NOT use instant)
  • 6 cups chicken broth
  • salt and pepper (extra black pepper if you like it)
  • dash of cayenne (can be omitted)
  • 1 tbs garlic powder
  • 16 oz shredded cheddar
  • 4 eggs, whisked
  • 1/2 cup milk
  • 1 stick butter, sliced 


Directions:
Preheat oven to 350. Grease 4 quart casserole dish.
Bring chicken broth and seasonings (salt, pepper, cayenne, garlic) to a boil.  Add grits, stir well, reduce heat to medium low.  Let simmer for 10 minutes.  Add in milk, and 3/4 (12oz) of cheese.  Stir until well combined.  Add butter and eggs.  Whisk for a couple of minutes until everything is well incorporated.  Pour into greased baking dish.  Top with remaining cheddar.  Bake for 45 minutes.
Enjoy!


March 30, 2015

Simply Sides 16 - Creamy Crock*Pot Potatoes

Can you believe in 34 years on this earth I have never had something as simple as a fingerling potato? Well, I have seen them a lot online and on TV but have never purchased or made them, so when I saw them on sale at Aldi for less than $1 a bag I grabbed them and found a recipe.  The recipe came from Pinterest (so this is both a Pinterest Pick AND a Crock*Pot Cafe recipe, as well as a side dish!!!).  Find the original recipe HERE. The sauce you finish this dish with tastes like a lighter alfredo sauce and was absolutely delicious with the chicken I served with these potatoes.  Simple (and cost effective!), this recipe is great for a weeknight side dish.

Creamy Crock*Pot Potatoes

Ingredients
  • 1-2 lbs fingerling potatoes, halved
  • 4 tbs butter, melted
  • 1/2 tsp dried dill
  • 1 tbs parsely
  • 1 tsp garlic powder
  • salt and pepper
  • 1/2 cup heavy cream
  • 1-2 handfuls of shredded mozzarella


Directions:
Place first 6 ingredients in the slow cooker insert and stir well.  Cover, and turn slow cooker on low for 8 hours.  Add cream and cheese, stir very well, and heat on high for 30 minutes.  Serve on the side of your favorite protein (I recommend a boneless skinless chicken breast - I seasoned mine with Greek seasoning and baked for 30 minutes while cream and cheese were cooking with the potatoes).
Enjoy!


January 12, 2015

Simply Sides 15 - Black Eyed Peas

Every New Year's Day I make black-eyed peas, along with other dishes that are supposed to bring you good luck in the New year.  Call me superstitious, but I need all the good fortune I can get!  I realized I have never shared my black eyed pea recipe on this blog, and decided now is a good time to do so.  You don't have to just make this on New Year's, it's a great side dish all year long!!!

Black Eyed Peas

Ingredients:

  • 2 cans black eyed peas (I just use a store brand, super cheap, and you can't tell the difference)
  • 1 ham hock (this is pretty essential)
  • 2 ounces pork jowl, diced - fry this up ahead of time, just like bacon.  Save the drippings!
  • 1 bell pepper, diced
  • 1 onion, diced
  • 2 cloves garlic, minced
  • 1-2 cups of broth (chicken or beef or veg, use your favorite)
  • 1 tbs cajun spice
  • 1 tsp (or more to taste) hot sauce (your favorite kind)
  • 1 tsp apple cider vinegar


Directions:
Rinse and drain black eyed peas.
In jowl (or bacon) drippings, saute onion and bell pepper for five or so minutes over medium heat, or until onion is translucent.  Add in garlic and cook for another minute. Add in black eyed peas and saute for 1 minute.  Place ham hock in pot.  Pour in 1 cup of broth, then add cajun spice.  Bring to a boil, then immediately reduce to a simmer.  Let beans simmer for 30 minutes (or longer). Add more both if necessary.  Stir in hot sauce, diced jowl, and vinegar.  You can serve it over rice, or as a side dish with your pork and greens and cornbread on New Year's Day.
Enjoy!


January 5, 2015

Miso Cucumber Salad - Pinterest Pick #1

This is the first post of our new category for 2015, Pinterest Picks!  This year, I am going to make lots of recipes that I find while perusing Pinterest, and post them here, with what I like, don't like, adaptations to the recipe, and hints of things I would add or take away.  I am so excited about this category as if you are a regular reader, you know how much I love me some Pinterest.

I love Asian flavors, and am a big fan of Miso, which is a soybean paste.  There are several varieties of miso.  I get my miso at Trader Joe's, but I am fairly certain you can find it in the Asian section of your local grocery store now.  I also know you can get it at places like Whole Foods Market or Fresh Market. Miso basically adds a salty, umami flavor that is super savory.

I found the pin for this cucumber salad HERE.  I love a refreshing cucumber dish, whether it's a simple salad of tomato and cucumbers in a vinaigrette or a creamy, vinegary side of cucumbers with a mayo/vinegar dressing.  

The only thing I changed about the original RECIPE was to halve the amount of sesame oil.  I just think a tablespoon was too much, as sesame oil is very pungent (although delicious!) and too many calories for what could be halved.  

This was a delicious side dish, very refreshing and packed with flavor.  Try it as a side to you next Asian inspired meal, a quick snack, or a light lunch with say a cooked chicken breast.  Plus, you can use this as a dressing for ANY veggies or salad.  It doesn't just have to be cucumbers.  This was a Pinterest hit!  

Oh and if you want to follow me on Pinterest, click HERE!

Miso Cucumber Salad

Ingredients:

  • 2 cucumbers, peeled, seeded, sliced
  • 2 tbs miso (recipe calls for brown or white miso, I used yellow miso)
  • 1 tsp red pepper flakes
  • 1 tbs honey
  • 1 1/2 tbs rice vinegar
  • 1 tbs hot water (I used water from my hottest tap setting)
  • 1/2 tbs sesame oil
  • 1 tbs sesame seeds


Directions:
Mix all ingredients except cucumbers together.  Blend well.  Fold in cucumbers.  
Enjoy!